Why would you want to do that?
In the first place, if you are a frontend designer, you might light to see the html and css from the comfort of your set up. For frontend developers or webdesigners, GUI, UX, and all the guys in the visual worrying, this will be like the following images are for me:
In resume, ecstasy are those 3 divine creations of humanity… ok, to the point.
Then you would be able to reuse that code and mix with other downloaded.
What do you have to do in order to do this:
Install wget, if you are in OSX, use
brew install wget
or if you are in Linux Debian or others
sudo apt-get install wget
After you have installed you just need to type one command:
wget -p -k http://www.wizardofbots.com
The -pwill get you all the required elements to view the site correctly (css, images, etc). The -k will change all links (to include those for CSS & images) to allow you to view the page offline as it appeared online.
Then you will get the full landing page and ready to be opened with Dreamweaver and start editing, you can copy that mate. Just don´t brag about it, and show some love at [email protected]
Well fuckers, we have something pretty cool today for all the music lovers, even we the bots love it, without it everything will be meaningless with lack of color in life.
To the point, what we are going to do:
Automatically search for google results using a dork(explained below) for mp3.
Grab the first 5 results from google.
Download all mp3 files located on those urls.
A google dork is a search command that will display pages with folders full of specific filetypes or more, so if you don’t know how to search you should do it this way:
“index of” + “mp3” + “radiohead” -html -htm -php
so this will look for folders (index of) that contains mp3 with the keyword radiohead and only display html, html and php pages.
The code is commented and well explained, if questions leave a comment.
The code is the same as we preview before in other posts, we have to define the search url using the dork, so we loop the first 5 results:
<?php
require_once('simple_html_dom.php'); // we need this library to parse
$keyword = urlencode('"index of" + "mp3" + "radiohead" -html -htm -php'); //the google dork escaped
$counter = 0; //set the counter to just do it the first 5 links.
$limit = 10; // e limit to 5
$google = 'http://www.google.com/search?q=' . $keyword .'&num=50';
// we start searching in google ;)
echo '#####################################';
echo '### SEARCHING IN GOOGLE ####';
echo '#####################################';
$html = file_get_html($google);
$linkObjs = $html->find('h3.r a');
foreach ($linkObjs as $linkObj) {
$title = trim($linkObj->plaintext);
$link = trim($linkObj->href);
// if it is not a direct link but url reference found inside it, then extract
if (!preg_match('/^https?/', $link) && preg_match('/q=(.+)&sa=/U', $link, $matches) && preg_match('/^https?/', $matches[1])) {
$link = $matches[1];
} else if (!preg_match('/^https?/', $link)) { // skip if it is not a valid link
continue;
}
print 'Title: ' . $title . '\n';
print 'Link: ' . $link . '\n';
if($counter <= $limit ) { //logic for only the limit you decide on the config
//this is very interesting, you can do it with also the below commented alternative
$cmd = "wget -A mp3 -m -p -E -k -K -np ". $link;
//$cmd = "wget --accept mp3 --mirror --progress --adjust-extension --convert-links --backup-converted --no-parent ".$link;
exec($cmd);
$counter++;
}
}
?>
The point of this script is to download all the mp3 files you want from your favorite artist, don’t worry it will separate all the grabbed content into specific folder for each of the domain that was used to download them and respective folders, so you can navigate to each and select the final mp3 that will remain with you and erase the others.
Tonight I was watching Mr. Robot chapter 4, season 2. And it remind me back the good old days where the IRC was above any other social network. People meet there in tons of channels to have chats and discussions. Also there were plenty of groups talking about many stuff, the best crews were the ones with coders.
So well, what do I like about IRC?, There were plenty of cool things back then in 1995, there were the amazing eggdrops that you programmed to respond to different messages. They also had TCL’s which mean addons/plugins that you could adapt to your bot, many were different cool games in group. Also there were PsyBNCs to be always online with your shell.
To run this just do the following:
mkdir bitchx
nano install_bitchx.sh
And then just paste this code:
#!/bin/sh
####################################################################################
#
# Download Compile and Install BitchX on Ubuntu
#
####################################################################################

# download bitchx source

# @todo make smarter, i.e. regexp, though now uses _always_ available commands (sic)
DOWNLOAD_URL=$(curl -s http://bitchx.sourceforge.net |\
        grep "http://sourceforge.net" |\
         sed -e "s|.*href=\"||g" |\
         sed -e "s|\".*||g" |\
         grep "/download" | uniq) # should only be one

if [ "${DOWNLOAD_URL}" = "" ]; then
  echo "ERROR: Could not find DOWNLOAD_URL from http://bitchx.sourceforge.net"
  exit 255;
fi

# @todo make smarter, i.e. regexp, though now uses _always_ available commands (sic)
VERSION=$(echo ${DOWNLOAD_URL} | sed -e "s|.*ircii-pana/bitchx-||g" | sed -e "s|\/.*||g")

if [ "${VERSION}" = "" ]; then
  echo "ERROR: Could not find VERSION from ${DOWNLOAD_URL}"
  exit 255;
fi

echo "Will try to download and install version ${VERSION}";

DOWNLOAD_URL=http://downloads.sourceforge.net/project/bitchx/ircii-pana/bitchx-${VERSION}/bitchx-${VERSION}.tar.gz

echo "Downloading: ${DOWNLOAD_URL}"
curl -L -s "${DOWNLOAD_URL}" -o bitchx-${VERSION}.tar.gz

# install required dev libraries
sudo apt-get install libssl-dev ncurses-dev

# unpack source
tar -xzf bitchx-${VERSION}.tar.gz

# go to source dir
cd bitchx-${VERSION}

# configure
./configure --prefix=/usr --with-ssl --with-plugins --enable-ipv6

# build
make

# install (change to "make install_local" for local installation; in your own $HOME)
sudo make install

# remove src + build
cd $OLDPWD && rm -rf bitchx-${VERSION}*

# done use "BitchX" to run...
Then you just have to:
chmod +x install_bitchx.sh
./install_bitchx.sh
And this will begin to install everything you need to run BitchX, then just type to run:
Hell yeah, this also deserves the place along nightmareJS, even though this doesnt use Electron for simulating browser, but a headless parser native libxml C bindings that will do a great job.
To start, you have to make sure you have previously installed nodejs libraries along with npm and if you get an error for the libxmljs library, make sure that you install this:
And then it should be working properly if you create a file.js and run the example script.
Here you have a bunch of examples to copy and paste to test it. In order to explain it further please ask your questions or requirements for video tutorials. I might open a premium spot for it, so you better fucking invite me a cup of oil so I can continue my compromise with you.
Craiglist example:
var osmosis = require('osmosis');

osmosis
.get('www.craigslist.org/about/sites')
.find('h1 + div a')
.set('location')
.follow('@href')
.find('header + div + div li > a')
.set('category')
.follow('@href')
.paginate('.totallink + a.button.next:first')
.find('p > a')
.follow('@href')
.set({
    'title':        'section > h2',
    'description':  '#postingbody',
    'subcategory':  'div.breadbox > span[4]',
    'date':         'time@datetime',
    'latitude':     '#map@data-latitude',
    'longitude':    '#map@data-longitude',
    'images':       ['img@src']
})
.data(function(listing) {
    // do something with listing data
})
.log(console.log)
.error(console.log)
.debug(console.log)
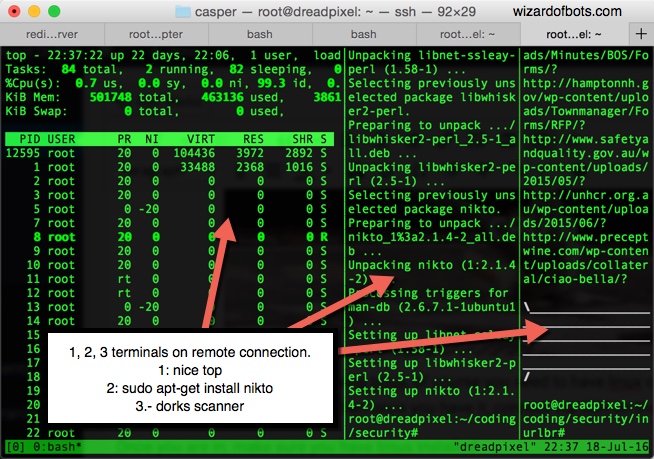
TMUX is tha maaaaan! Sure as death that you are going to love this! Remember when you ran a scan on a remote VPS? every time that you left it working it got the broken pipe, so you lost the session and you don’t get the results you wanted till the end of the code.
But with TMUX, you can leave running many SSH “sessions/terminals” working many processes. You can leave scrapers, scanners, crawlers, and even an app working on nginx/apache. Its like using all the process of your VPS and not losing any single fucking penny!
Its something like this:
So let’s get physical now, for having tmux, of course you need to have linux on any provider you want, it can be 512 MB RAM, $5 USD on Digitalocean. Then once you have it, connect via SSH on the terminal like: ssh root@ip.
Once you are in, make sure you have tmux installed:
sudo apt-get install tmux
Then, to open make sure to type tmux on the terminal and it will open.
So basic navigation on the tmux would be this by default:
Ctrl-b c Create new window
Ctrl-b d Detach current client
Ctrl-b l Move to previously selected window
Ctrl-b n Move to the next window
Ctrl-b p Move to the previous window
Ctrl-b & Kill the current window
Ctrl-b , Rename the current window
Ctrl-b % Split the current window into two panes
Ctrl-b q Show pane numbers (used to switch between panes)
Ctrl-b o Switch to the next pane
Ctrl-b ? List all keybindings
The trick here is that you can have as many SSH windows you want doing Ctrl-b c and then running other process that you can navigate with Ctrl-b n and Ctrl-b p (from next, previous) , else you can have your window split if you do Ctrl-b % and you can watch all in panels.
IMPORTANT: If you want to exit TMUX and leave the session working with the scripts you ran, you have to do CTRL-B D which means it will detach.
Then afterwards, when you come back from your procrastination you can go and type:
tmux attach
Which will make you restore your tmux session that you left working with other processes.
Then when you come back to your session, you will see everything is finished or keep running extracting more data
So now you know how to take the most of what you pay for the VPS, hope you like it and leave the love dudes ;).
Here is a good vid that explains deeply more about tmux:
Damn, this is so fucking awesome. Automating your browser using Electron with NightmareJS. Electron is being funded by Github and its competitor is NWJS funded by Intel. So we have a good platform to simulate browser and interact with it. Using PhantomJS on its core.
So if you want to start just make sure you have installed everything for the NodeJS dev environment, that includes:
Sometimes you just want to make your life easier on deploying a server in seconds with all the dependencies you need to run many languages or maybe a LAMP config easily.
I made this whole compilation guys, but right now I dont feel like finishing it. So I decided to add a github repo so you can just clone and run it very quick. But I will be updating this post frequently. Just make sure to comment in order to report a bug or something that needs to be modified, also there https://github.com/wizardofbots/wizardinstall
So I decided to call it wizardinstall 😉 we will be adding the repos you need in order to have everything ready to start on a $5 cents digitalocean server to have a linux shell on your smartphone doing a realtime connection and executing your scripts!
So check out the code, you will learn how to use it, and understand the logics, will add comments on each line if necessary so you guys understand:
#!/bin/bash
# ******************************************
# Program: Dev mode install
# Developer: Wizard of Bots
# Site: http://wizardofbots.com/network
# Github: https://github.com/wizardofbots/wizardinstall
# Date: 16-07-2016
# ******************************************
# this line below is checking if the lsb_release -is comment response is
# equal to Ubuntu and also Debian, because we can use apt-get instead of yum.
if [ "`lsb_release -is`" == "Ubuntu" ] || [ "`lsb_release -is`" == "Debian" ]
then
    # save time and install essential and then all libraries
    sudo apt-get install -y build-essential;
    # install git
    sudo apt-get install git; # git is really useful, in fact clone this from: https://github.com/wizardofbots/wizardinstall
    # install python
    sudo apt-get install libreadline-gplv2-dev libncursesw5-dev libssl-dev libsqlite3-dev tk-dev libgdbm-dev libc6-dev libbz2-dev;
    sudo apt-get python2.7;
    sudo apt-get install python-software-properties;
    # install php
    sudo apt-get install apache2;
    sudo apt-get install curl;
    sudo apt-get install mysql-server;
    sudo apt-get install php libapache2-mod-php php-mcrypt php-mysql;
    sudo systemctl restart apache2;
    sudo systemctl status apache2;
    sudo apt-get install php-cli;
    # install package manager for PHP: Composer
    sudo apt-get update;
    # install perl
    sudo apt-get install perl;
    # install ruby
    sudo apt-add-repository ppa:brightbox/ruby-ng
    sudo apt-get update
    sudo apt-get install ruby1.9.3
    # installing nodejs
    sudo apt-get update;
    curl -sL https://deb.nodesource.com/setup_6.x | sudo -E bash -;
    sudo apt-get install -y nodejs;
    sudo chmod 777 -R /var/www/;
    sudo printf "<?php\nphpinfo();\n?>" > /var/www/html/info.php;
    sudo service apache2 restart;
# then this logic identifies if the release is CentOS or RedHat so we can use yum
elif [ "`lsb_release -is`" == "CentOS" ] || [ "`lsb_release -is`" == "RedHat" ]
then
    # this lines are not working properly right now. So wait for the update
    sudo yum -y install httpd mysql-server mysql-devel php php-mysql php-fpm;
    sudo yum -y install epel-release phpmyadmin rpm-build redhat-rpm-config;
    sudo yum -y install mysql-community-release-el7-5.noarch.rpm proj;
    sudo yum -y install tinyxml libzip mysql-workbench-community;
    sudo chmod 777 -R /var/www/;
    sudo printf "<?php\nphpinfo();\n?>" > /var/www/html/info.php;
    sudo service mysqld restart;
    sudo service httpd restart;
    sudo chkconfig httpd on;
    sudo chkconfig mysqld on;

# we will add pacman for Arch Linux soon
else
    echo "Unsupported Operating System";
fi
I made an article about this because it took me about 2 hours to solve it. Seems like all sources are outdated with their methods. Many people were talking about using module html2text which is now deprecated, then many others recommended nltk and well.. The final result is that now BeautifulSoup does a better job that them. Buuuut…..
All resources were saying about this function called get_text() which is completely incorrect, it must be getText() camel case in order to make this conversion work.
Why I would need to do this? Well, specially when some networks try to encode with strange HTML DOM characters that makes your scraping a nightmare. But here is the chunk of code explained.
from BeautifulSoup import BeautifulSoup as Soup
import re, urllib2, nltk

url = 'http://google.com'
html = urllib2.urlopen(url).read() #make the request to the url
soup = Soup(html) #using Soup on the responde read
for script in soup(["script", "style"]): #You need to extract this <script> and <style> tags
    script.extract() #strip them off
text = soup.getText() #this is the method that I had like 40 min problems
text = text.encode('utf-8') #make sure to encode your text to be compatible
#raw = nltk.clean_html(document)
print(text.encode('utf-8'))
So you now know how to get text from a response, it will be now easy to get some data using Regular Expressions 🙂
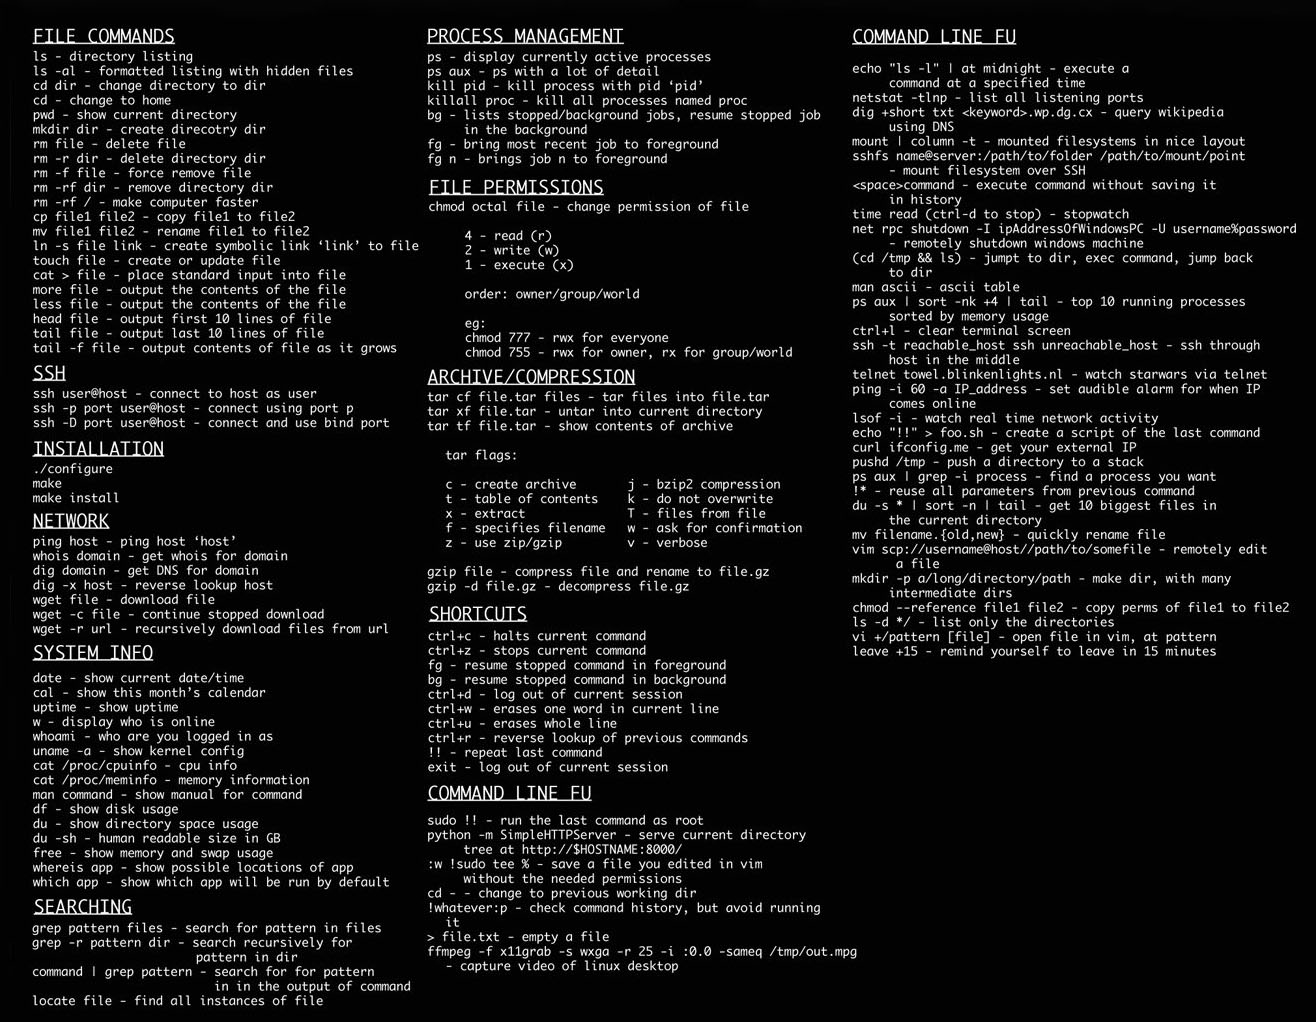
This is kind of a must have in your shortcuts for easy access to know more about how you can combine multiples commans with the && sign.
So here is the image:
Simple HTML DOM is a PHP library that helps you parse the DOM and get to find things inside the DOM very fast, instead of using plain PHP that will take you hours to make your own libraries. There is another similar that is called PHP Selector.
What we want to do is to grab the results of Bing in this case.
<?php
$keyword = $argv[1]; // send the argument when you run the script like = php this.php your keyword
require_once('simple_html_dom.php');
$bing = 'http://www.bing.com/search?q=' . $keyword . '&count=50';
// We do it with bing but it is almost the same with the other searches.
echo '#####################################';
echo '### SEARCHING IN BING ####';
echo '#####################################';
$html = file_get_html($bing);
$linkObjs = $html->find('li h2 a');
foreach ($linkObjs as $linkObj) {
$title = trim($linkObj->plaintext);
$link = trim($linkObj->href);
// if it is not a direct link but url reference found inside it, then extract
if (!preg_match('/^https?/', $link) && preg_match('/q=(.+)&sa=/U', $link, $matches) && preg_match('/^https?/', $matches[1])) {
$link = $matches[1];
} else if (!preg_match('/^https?/', $link)) { // skip if it is not a valid link
continue;
}
print '<p>Title: ' . $title . '<br />\n';
print 'Link: ' . $link . '</p>\n';
}
So this is practically it, you are using the find() function from Simple HTML DOM library in the DOM to find the links.
If you need more help in this remember I can help with custom bots 😉


 After you have installed you just need to type one command:


 Sometimes you just want to make your life easier on deploying a server in seconds with all the dependencies you need to run many languages or maybe a LAMP config easily.
 I made an article about this because it took me about 2 hours to solve it. Seems like all sources are outdated with their methods. Many people were talking about using module html2text which is now deprecated, then many others recommended nltk and well.. The final result is that now BeautifulSoup does a better job that them. Buuuut…..