TMUX is tha maaaaan! Sure as death that you are going to love this! Remember when you ran a scan on a remote VPS? every time that you left it working it got the broken pipe, so you lost the session and you don’t get the results you wanted till the end of the code.

But with TMUX, you can leave running many SSH “sessions/terminals” working many processes. You can leave scrapers, scanners, crawlers, and even an app working on nginx/apache. Its like using all the process of your VPS and not losing any single fucking penny!

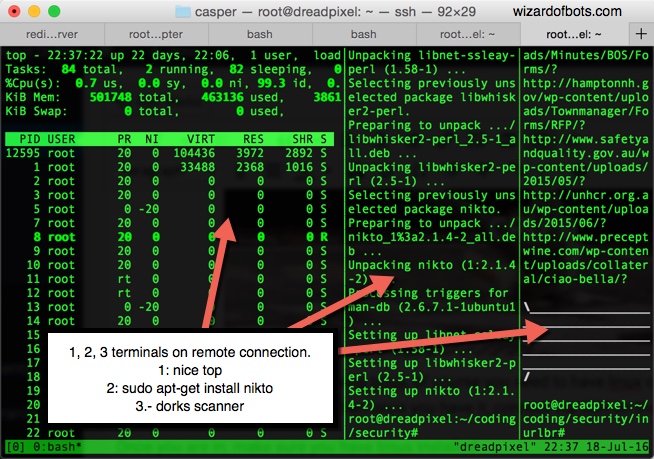
Its something like this:

So let’s get physical now, for having tmux, of course you need to have linux on any provider you want, it can be 512 MB RAM, $5 USD on Digitalocean. Then once you have it, connect via SSH on the terminal like: ssh root@ip.

Once you are in, make sure you have tmux installed:

sudo apt-get install tmux

Then, to open make sure to type tmux on the terminal and it will open.

So basic navigation on the tmux would be this by default:

  • Ctrl-b c Create new window
  • Ctrl-b d Detach current client
  • Ctrl-b l Move to previously selected window
  • Ctrl-b n Move to the next window
  • Ctrl-b p Move to the previous window
  • Ctrl-b & Kill the current window
  • Ctrl-b , Rename the current window
  • Ctrl-b % Split the current window into two panes
  • Ctrl-b q Show pane numbers (used to switch between panes)
  • Ctrl-b o Switch to the next pane
  • Ctrl-b ? List all keybindings

The trick here is that you can have as many SSH windows you want doing Ctrl-b c and then running other process that you can navigate with Ctrl-b n and Ctrl-b p (from next, previous) , else you can have your window split if you do Ctrl-b % and you can watch all in panels.

IMPORTANT: If you want to exit TMUX and leave the session working with the scripts you ran, you have to do CTRL-B D which means it will detach.

Then afterwards, when you come back from your procrastination you can go and type:

tmux attach

Which will make you restore your tmux session that you left working with other processes.

Then when you come back to your session, you will see everything is finished or keep running extracting more data

tmux1

So now you know how to take the most of what you pay for the VPS, hope you like it and leave the love dudes ;).

Here is a good vid that explains deeply more about tmux:

installwizardSometimes you just want to make your life easier on deploying a server in seconds with all the dependencies you need to run many languages or maybe a LAMP config easily.

I made this whole compilation guys, but right now I dont feel like finishing it. So I decided to add a github repo so you can just clone and run it very quick. But I will be updating this post frequently. Just make sure to comment in order to report a bug or something that needs to be modified, also there https://github.com/wizardofbots/wizardinstall

So I decided to call it wizardinstall 😉 we will be adding the repos you need in order to have everything ready to start on a $5 cents digitalocean server to have a linux shell on your smartphone doing a realtime connection and executing your scripts!

So check out the code, you will learn how to use it, and understand the logics, will add comments on each line if necessary so you guys understand:

#!/bin/bash
# ******************************************
# Program: Dev mode install
# Developer: Wizard of Bots
# Site: http://wizardofbots.com/network
# Github: https://github.com/wizardofbots/wizardinstall
# Date: 16-07-2016
# ******************************************
# this line below is checking if the lsb_release -is comment response is 
# equal to Ubuntu and also Debian, because we can use apt-get instead of yum.
if [ "`lsb_release -is`" == "Ubuntu" ] || [ "`lsb_release -is`" == "Debian" ] 
then
    # save time and install essential and then all libraries
    sudo apt-get install -y build-essential;
    # install git
    sudo apt-get install git; # git is really useful, in fact clone this from: https://github.com/wizardofbots/wizardinstall
    # install python
    sudo apt-get install libreadline-gplv2-dev libncursesw5-dev libssl-dev libsqlite3-dev tk-dev libgdbm-dev libc6-dev libbz2-dev;
    sudo apt-get python2.7;
    sudo apt-get install python-software-properties;
    # install php
    sudo apt-get install apache2;
    sudo apt-get install curl;
    sudo apt-get install mysql-server;
    sudo apt-get install php libapache2-mod-php php-mcrypt php-mysql;
    sudo systemctl restart apache2;
    sudo systemctl status apache2;
    sudo apt-get install php-cli;
    # install package manager for PHP: Composer
    sudo apt-get update;
    # install perl
    sudo apt-get install perl;
    # install ruby
    sudo apt-add-repository ppa:brightbox/ruby-ng
    sudo apt-get update
    sudo apt-get install ruby1.9.3
    # installing nodejs
    sudo apt-get update;
    curl -sL https://deb.nodesource.com/setup_6.x | sudo -E bash -;
    sudo apt-get install -y nodejs;
    sudo chmod 777 -R /var/www/;
    sudo printf "<?php\nphpinfo();\n?>" > /var/www/html/info.php;
    sudo service apache2 restart;
# then this logic identifies if the release is CentOS or RedHat so we can use yum
elif [ "`lsb_release -is`" == "CentOS" ] || [ "`lsb_release -is`" == "RedHat" ]
then
    # this lines are not working properly right now. So wait for the update
    sudo yum -y install httpd mysql-server mysql-devel php php-mysql php-fpm;
    sudo yum -y install epel-release phpmyadmin rpm-build redhat-rpm-config;
    sudo yum -y install mysql-community-release-el7-5.noarch.rpm proj;
    sudo yum -y install tinyxml libzip mysql-workbench-community;
    sudo chmod 777 -R /var/www/;
    sudo printf "<?php\nphpinfo();\n?>" > /var/www/html/info.php;
    sudo service mysqld restart;
    sudo service httpd restart;
    sudo chkconfig httpd on;
    sudo chkconfig mysqld on;

# we will add pacman for Arch Linux soon
else
    echo "Unsupported Operating System";
fi